The
following topics are covered in this section:
|
|||||||||||||||
 |
|||||||||||||||
Inputs
|
|||||||||||||||
Interfacing Digital Inputs to TTL
|
|||||||||||||||
Before we
can discuss interfacing digital signals to TTL inputs, we must remind
ourselves of the voltage and current levels of a TTL input.
|
|||||||||||||||
The logic
levels for TTL inputs are as follows:
|
|||||||||||||||
|
|||||||||||||||
When a
HIGH is applied to a TTL input it draws very little current (about 40 uA).
When a LOW is applied to a TTL input it sources approximately 1.6 mA.
|
|||||||||||||||
Therefore,
when interfacing a digital input (which will be either HIGH or LOW) to TTL we
must ensure it meets the requirements of a TTL input.
|
|||||||||||||||
The
diagram below shows how to interface a digital input (ie; either high or low)
to TTL.
|
|||||||||||||||
 |
|||||||||||||||
When the
digital input is HIGH the transistor will be turned on. This results in a
direct path from the port pin to ground, therefore the pin is logic 0. When
the digital input is LOW the transistor is off which means there is no path
for current from the collector to the emitter, therefore the port pin will
read 5V.
|
|||||||||||||||
This circuit
results in logic inversion, but this should not be a problem as inverting the
port pin through software is very easy.
|
|||||||||||||||
When the
transistor is on the port pin is connected directly to ground. Therefore
there is a path for the 1.6 mA from the port pin (TTL current when input is
LOW). The 10 K emitter resistor ensures the current from the supply is kept
low, an important consideration in battery powered devices.
|
|||||||||||||||
When the
transistor is off the port pin is at 5 V (in reality it will not be exactly
5V because a transistor is never fully off and a small current will flow
through the emitter resistor, resulting in a small voltage drop across the
resistor - but the voltage level on the resistor will still be close to 5 V).
Since there is very little current flowing, power consumption is kept low.
Also, as mentioned above, a TTL input draws very little current when a HIGH
is applied to it, so this circuit satisfies the requirements of a TTL input
and keeps power consumption at a minimum.
|
|||||||||||||||
The digital HIGH need not be TTL level inputs.
|
|||||||||||||||
The HIGH
voltage applied to the base of the transistor does not have to be 5V. For
example, the input circuit could be from temperature sensor that produces a
HIGH voltage when the temperature exceeds a certain value. The voltage level
from this circuit could be any voltage that is high enough to turn on the
transistor (say, 12V for example) and the value of the base resistor can be
calculated to suit. Because the voltage applied to the emitter resistor is 5
V the digital HIGH from the sensor circuit is level-shifted to suit a TTL
input.
|
|||||||||||||||
Switches
|
|||||||||||||||
The
circuit above is actually interfacing an electronic switch, the transistor,
to a TTL input. We can interface a physical switch in exactly the same way, as
shown below.
|
|||||||||||||||
 |
|||||||||||||||
When the
switch is open, no current flows through the resistor and therefore the
voltage on the microcontroller pin is 5 V. When the switch is closed the pin
is connected directly to ground. As before, when the TTL input is HIGH practically
no current flows in the circuit and when the input is LOW there is a direct
current for the 1.6 mA that may flow from the pin.
|
|||||||||||||||
Switch Bounce
|
|||||||||||||||
When a
physical switch is closed the contacts bounce open and closed rapidly for
about 20 to 30 ms, as illustrated below.
|
|||||||||||||||
 |
|||||||||||||||
The
opening of a switch is clean and without bounce. However, when a switch is
closed the contacts bounce open and closed for about 30 ms. While this is a
very short time in human terms it is a very long time for a microcontroller
(the basic 8051 running on a system clock of 12 MHz executes a 1-byte
instruction in 1 us). Without switch debouncing, the microcontroller would
'think' the switch was opened and closed many times. Imagine if a push-button
switch was being used to increment the output from a microcontrolled power
supply. If the switch was connected to the microcontroller without switch
bounce then a user pressing the switch once would actually result in the
output voltage being increased many times because the microcontroller would
respond as if the switch had been pressed many times.
|
|||||||||||||||
Hardware Switch Debounce
|
|||||||||||||||
One method
of hardware debounce is shown below.
|
|||||||||||||||
  |
|||||||||||||||
As can be
seen from the waveforms above, when the switch is closed the capacitor
voltage drops to 0 V. When the switch bounces open the capacitor begins to
charge back up to 5 V, but due to the RC constant, it cannot charge beyond
the schmitt trigger's HIGH reference voltage before the switch bounces closed
again. Once the switch closes, the capacitor again drops to 0 V. Since the
voltage on the capacitor never goes beyond the trigger's HIGH reference
voltage during the switch bounce, the output of the trigger remains LOW and
the switch bounce is not seen on the port pin.
|
|||||||||||||||
When the
switch is physically opened the capacitor has plenty of time to charge beyond
the trigger's HIGH reference voltage, at which point the trigger output goes
HIGH and this is seen on the port pin.
|
|||||||||||||||
Software Switch Debounce
|
|||||||||||||||
Hardware
debounce requires extra circuitry. With small devices, this extra hardware
may not be tolerated. In most cases, software debounce is more than adequate.
Software debounce simply incorporates a delay of about 30 ms while the switch
bounces. In other words, when a key press is detected, the system delays for
about 30 ms before processing the input. By then the switch will have stopped
bouncing and the microcontroller will only process the initial switch
contact.
|
|||||||||||||||
 |
|||||||||||||||
Delaying
for about 30 ms will not be noticed by the user, but the microcontroller
could do quite a bit of work in that time. Therefore, in a multifunction
system it is more efficient to initialise a timer and start it so that it
will overflow and generate an interrupt 30 ms after the switch was pressed.
In that way, the controller can be doing some other work while the switch
bounces.
|
|||||||||||||||
 |
|||||||||||||||
In the
above flow chart diagrams, processing the key press is handled in the ISR.
This may not be the case in a multifunction system. It is more likely that
the ISR would set a flag to let the main program know that a key has been
pressed (or, in an RTOS system, to move a process from the waiting state to
the ready state).
|
|||||||||||||||
Keypads
|
|||||||||||||||
Keypads
are assembled in a matrix form, as illustrated below.
|
|||||||||||||||
 |
|||||||||||||||
The above
diagram shows a 4 X 4 keypad - 16 switches configured
in 4 columns and 4 rows.
|
|||||||||||||||
In the
default state (all switches open) there is no connection between the rows and
columns. When a switch is pressed a connection between the switch's row and
the switch's column is made.
|
|||||||||||||||
Keypad Decoder
|
|||||||||||||||
Many
keypads are built with an onboard decoder that scans the keypad and, if a key
is pressed, returns a number identifying the key. Alternatively, a keypad
decoder chip can be purchased separately and interfaced with a keypad. The
diagram below shows a 4 X 4 keypad
interfaced with such a decoder.
|
|||||||||||||||
 |
|||||||||||||||
The
decoder is shown connected to the 8051, as a suggestion. Obviously, the
outputs from the decoder don't need to go to the LSBs of P1, nor does the
data available line (DA) need to be connected to the external 0 interrupt
line. However, the above configuration is one way of interfacing a 4 X 4
keypad decoder to the 8051.
|
|||||||||||||||
The
decoder has 8 inputs; the 4 X inputs are connected to the 4 keypad columns
while the Y inputs are connected to the 4 keypad rows. Not shown in the
diagram are pins for connecting capacitors to the decoder. These capacitors
govern the rate at which the keypad is scanned.
|
|||||||||||||||
When a key
is pressed the 4-bit code for the key (there are 16 keys, therefore there are
codes 0000 to 1111 in binary) appears on the four output lines (and in this
case will appear on the 4 LSBs of P1) and the data available line (DA) goes
LOW. If connected to an external interrupt line (in this case, the INT0-bar
line) the microcontroller will be interrupted when a key is pressed. The ISR
could then read the 4 LSBs of P1 and process the data.
|
|||||||||||||||
The
decoder chip takes care of switch debounce, therefore the programmer is freed
from this responsibility, which is an advantage of using a decoder chip.
|
|||||||||||||||
Software Decoder
|
|||||||||||||||
The above
decoder function can be implemented in software. The keypad could be
interfaced with the 8051 as detailed below.
|
|||||||||||||||
 |
|||||||||||||||
With the
above configuration, an interrupt is generated on the INT0-bar line when a
key is pressed. We will deal with how this works in a moment. Firstly, let's
see how the keyboard is scanned.
|
|||||||||||||||
The steps
are:
|
|||||||||||||||
|
|||||||||||||||
Scanning a
row is achieved by applying 0 V to the port pin for that row and 5 V to the
other three rows, then scanning each individual column to see if one of them
is LOW. If it is, then the key at the junction between the current row and
column being scanned is the pressed key.
|
|||||||||||||||
|
|||||||||||||||
For
example, let's say the key being pressed is key 6. When scanning the first
row, P1.0 will be cleared while the other 3 rows (P1.1, P1.2 and P1.3) are
set, as detailed in the diagram below.
|
|||||||||||||||
 |
|||||||||||||||
Since no
key in this row is closed there is no path for current through any of the
pull-up resistors and all 4 columns (on P1.4 to P1.7) are HIGH. Therefore,
the key pressed was not found while scanning row 1.
|
|||||||||||||||
The
diagram below illustrates scanning row 2. (Note that key 6 is still closed.)
|
|||||||||||||||
 |
|||||||||||||||
In this
case, column 3 is connected through the closed switch to row 2. Since row 2
is LOW, column 3 is LOW.
|
|||||||||||||||
A series
of flowcharts for implementing software keypad scan is given below:
|
|||||||||||||||
 |
|||||||||||||||
 |
|||||||||||||||
 |
|||||||||||||||
 |
|||||||||||||||
 |
|||||||||||||||
The keypad
is initialised in the main program; all rows are cleared. Therefore, when a
key is pressed, since all rows are LOW, then one of the columns (the one
containing the key that has been pressed) will be connected to 0 V. This
logic 0 into the AND gate will result in a logic 0 out. Since the output of
the AND gate is connected to INT0-bar, a key press will result in an external
0 interrupt.
|
|||||||||||||||
The
keyPressedISR is the ISR for dealing with an external 0 interrupt. The first
thing this ISR does is disable the external 0 interrupt and call a 30 ms
(typical) delay subroutine. When the delay subroutine returns the key will
have stopped bouncing and the keypad can now be scanned.
|
|||||||||||||||
In this
example, the value of the key pressed (0 to 15) will be stored in R0.
Therefore, at the start of the scanKeypad subroutine R0 is set to 0. Row 1 is
cleared while the other three rows are set. The columnScan subroutine is then
called. It tests the status of each column. If the first column is 0 then,
since we are currently scanning row 1, key 0 was pressed and its value is in
R0. Therefore the keyFound flag is set and the subroutine returns.
|
|||||||||||||||
If the
first column is not 0, R0 is incremented (it now holds 1) and the next column
is tested. If it is 0 then key 1 was pressed and this value is in R0 -
therefore the keyFound flag is set and the subroutine returns.
|
|||||||||||||||
This is
repeated for all columns until the key is found.
|
|||||||||||||||
If none of
the four columns is 0 then the key pressed is not in this row and the
subroutine returns without setting the keyFound flag.
|
|||||||||||||||
When
columnScan returns, the keyFound flag is tested. If it is not 1 then the key
was not found and the scanKeypad subroutine continues with the next row.
Throughout this process, R0 is incremented so that when the key is finally
found R0 will contain the value of that key.
|
|||||||||||||||
When
scanKeypad returns to the ISR the value of the key is in R0. The ISR then
calls a subroutine to wait for the key to be released. If we do not wait for
the key to be released and immediately enable the external 0 interrupt, then
the system will react as if the key was pressed again. Even if a user presses
and releases the key as quickly as possible, the microcontroller will have
executed the ISR and enabled the INT0 interrupt before the user actually
released the key. Therefore we wait for the user to release the key before
proceeding.
|
|||||||||||||||
The
waitForKeyRelease subroutine is quite simple. All four rows are cleared so
that no matter which key is pressed, one of the columns will be 0 which will
result in a 0 out of the AND gate to the INT0-bar line. Therefore, while the
key is held down this line will be 0. Once the key is released then all four
columns will be 1 resulting in a 1 at INT0-bar and the subroutine returns.
|
|||||||||||||||
The
external 0 interrupt flag (IE0) is then cleared because it may have been set
as the key bounces and as we scanned the keyboard (remember, disabling an
interrupt does not prevent the interrupt from occurring - a 0 on INT0 will
still set the flag, IE0). If we did not clear this flag, once we again enable
the external 0 interrupt the system would again vector to keyPressedISR.
|
|||||||||||||||
The
processKeyFlag is then set to alert the main program to the fact that a key
was pressed. The main program can then retrieve the value of the key from R0
and process it in whatever way the system design requires.
|
|||||||||||||||
Separate Debounce Interrupt
|
|||||||||||||||
One of the
problems with the above implementation is the fact that the system is held in
a 30 ms delay while the key bounces. The microcontroller could be doing
something a lot more useful in that time (remember, a basic 8051 running on a
system clock of 12 MHz could execute 30,000 1-byte instructions in that
time). One way would be to set one of the timers to overflow in 30 ms, enable
the timer's interrupt, start the timer and exit the keyPressedISR. The
timer's ISR could then execute the rest of the keypad scan process (ie;
what's left in keyPressedISR above goes into the timer's ISR instead).
|
|||||||||||||||
Doing Nothing While the Key is Held Down
|
|||||||||||||||
In the
above implementation the system is held up doing nothing as it waits for the
key to be released. Even in the short space of time of an ordinary key press,
the controller could be doing something useful, but it is even more wasteful
if you imagine a user holding the key down for a long time. One solution with
the 8051 would be to initialise the external 0 interrupt as negative-edge
activated rather than low-level activated. In this case, the
waitForKeyRelease subroutine would not be needed at all. Once the external 0
interrupt is again enabled in keyPressedISR another external 0 interrupt
could not occur until the key was released and another (or the same one)
pressed; only this would result in a negative edge on INT0-bar.
|
|||||||||||||||
Note: there is one other task performed by
waitForKeyRelease - in performing its function it resets all four rows. If
this subroutine is removed, as suggested, then the code for clearing the rows
(ie; CLR P1.0; CLR P1.1; CLR P1.2; CLR P1.3) must be included in
keyPressedISR so that the system is then ready for the next key press.
|
|||||||||||||||
ADC Interfacing
|
|||||||||||||||
The
schematic symbol for a typical analogue-to-digital converter is shown below.
On the right is an illustration of how the ADC may be interfaced with the
8051.
|
|||||||||||||||
|
|||||||||||||||
The
function of the ADC pins are as follows:
|
|||||||||||||||
|
|||||||||||||||
In the
above example of interfacing the ADC to the 8051, the CS-bar line is
connected to ground to permanently enable the chip. The INTR-bar line goes
LOW once a conversion is complete, therefore it is connected to one of the
external interrupt pins on the 8051. In this way, the 8051 will be
interrupted when a conversion is complete and data is ready for reading.
|
|||||||||||||||
The data
lines are tri-state (hence the inverted triangle symbol) which means this
chip can be memory mapped and the data lines can be connected directly to the
data bus. In the above example the data lines are connected to port 1, but
since they are tri-state the port can also be used for something else. Only
when the conversion is complete is P2.0 cleared which enables the data lines
and the analogue conversion appears on port 1.
|
|||||||||||||||
The WR-bar
line is used for starting a conversion. Clearing this line resets the
internal successive-approximation register and the 8-bit shift register. When
the line is set conversion begins.
|
|||||||||||||||
Therefore,
taking a reading from the ADC is a two step process:
|
|||||||||||||||
|
|||||||||||||||
Using an
interrupt allows the microcontroller to do some work during the 100 us it
takes to convert the analogue input into digital.
|
|||||||||||||||
Outputs
|
|||||||||||||||
We will
now look at interfacing output devices to microcontroller ports, focusing on
the following topics:
|
|||||||||||||||
|
|||||||||||||||
TTL Compatibility
|
|||||||||||||||
When
discussing interfacing to TTL inputs above, we noted the current sinked by a
TTL input when the input is HIGH is approximately 40 uA. Since the fan-out of
TTL is 10, the maximum current sourced by a TTL output HIGH is 400 uA.
|
|||||||||||||||
The
current sourced by a TTL input when the input is LOW is 1.6 mA, therefore (with
a fan-out of 10) the maximum current sinking for a TTL output LOW is 16 mA.
|
|||||||||||||||
LEDS
|
|||||||||||||||
Therefore,
when interfacing an LED to a TTL output, the maximum current through the LED
is 16 mA. The circuit below shows how to interface an LED to a microcontroller
port pin.
|
|||||||||||||||
|
|||||||||||||||
As
explained, this limits the LED on current to 16 mA, which in most cases is
adequate. However, if more current is required, the second circuit shown
above may be used. Note that both circuits result in the microcontroller port
pin sinking current when the LED is on, which is desirable as port pins will
sink a lot more current than they will source.
|
|||||||||||||||
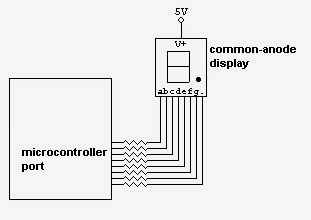
7-segment Displays
|
|||||||||||||||
Interfacing
a single 7-segment display to a microcontroller port is done in the same
manner as interfacing a single LED. Again, the LEDs can be connected directly
to the port pins or, if high current LEDs are being used, they can be
connected through p-n-p transistors. Both methods are detailed below.
|
|||||||||||||||
|
|||||||||||||||
Multiplexing
|
|||||||||||||||
It is
often necessary to interface a number of 7-segment displays to a
microcontroller. Rather than use a separate port for each display, all of the
displays are connected to the same port and other port pins are used for
switching on one display at a time.
|
|||||||||||||||
 |
|||||||||||||||
As long as the displays are turned on and off fast
enough, to the eye it will seem as if they are all on together. A timer
interrupt could be used to switch from one display to the next. For example,
timer zero could be set to interrupt once every five milliseconds. The
operation of the timer zero ISR would be:
|
|||||||||||||||
DC Motors
|
|||||||||||||||
An
interfacing method for turning on and off a DC motor via a microcontroller is
shown below.
|
|||||||||||||||
 |
|||||||||||||||
However,
the above circuit will only work for a 5 V motor. If the supply voltage is
changed (for example, if the supply is changed to 12 V to run a 12 V motor)
then the motor will be on all the time because 5 V applied to the base of the
p-n-p transistor is not enough to turn it off.
|
|||||||||||||||
To
interface to larger motors the following circuit may be used.
|
|||||||||||||||
 |
|||||||||||||||
In the
above example a 12 V DC motor is interfaced to a microcontroller. When the
port pin is set (ie; is equal to 5 V) the p-n-p transistor is off which means
the n-p-n transistor is also off. Therefore there is no path for current
through the motor and the motor is off.
|
|||||||||||||||
When the
port pin is cleared the p-n-p transistor is on. This turns on the n-p-n
transistor which allows current to flow through the motor to ground; the
motor is on.
|
|||||||||||||||
The value
of R2 needs to be carefully chosen; too high and the current into the base of
the n-p-n transistor will not be enough to turn on the transistor, too low
and the circuit draws too much current.
|
|||||||||||||||
Bi-directional DC Motor
|
|||||||||||||||
A circuit
diagram for interfacing a 12V DC motor to a microcontroller in a way that
allows the controller to not only turn on and off the motor but also to set
the direction in which the motor runs when it is on, is given below.
|
|||||||||||||||
 |
|||||||||||||||
The
circuit is made up of a bridge. If both sides of the motor are at the same
voltage the motor is off. So, if T1 and T3 are on, both sides of the motor
are connected to 12 V and the motor is off. If T2 and T4 are on both sides of
the motor are connected to ground and, again, the motor is off.
|
|||||||||||||||
If T1 and
T4 are on then the left side of the motor is at 12 V and the right side is at
ground, therefore the motor runs in one direction. We will call this forward.
|
|||||||||||||||
If T3 and
T2 are on then the left side of the motor is at ground and the right side is
at 12 V, therefore the motor runs in the opposite direction; ie, reverse.
|
|||||||||||||||
The
circuit is designed so that T1 and T2 cannot be on at the same time and T3
and T4 cannot be on at the same time. This is very important; if T1 and T2
were on at the same time there would be a short circuit between 12 V and
ground and the transistors would burn out. The same is true for T3 and T4.
|
|||||||||||||||
The truth
table for the circuit with its two inputs, A and B, is given
below.
|
|||||||||||||||
|
|||||||||||||||
An
explanation of the four entries in the table is given below:
|
|||||||||||||||
|
|||||||||||||||
1/18/2015
Peripheral Interfacing EdSim51 simulator


Subscribe to:
Posts (Atom)