1. Root Galaxy Tab 3 10.1 GT-P5200 Running on Stock Firmware- Easy Guide
If you are looking for an easy and
working method to root your Samsung Galaxy Tab 3 10.1 GT-P5200 Tablet,
then you're on right place. Here at NasirTech, you'll find a simple step by
step guide to root Galaxy Tab 3 10.1 P5200 running on official firmware which
is currently Android
4.2.2 Jelly Bean. The device
was released with Android 4.2.2 Jelly Bean and already received many firmware
update. If you own the tablet and wish to root, then you can now root it using
the below tutorial.After having an Android device or, after updating official firmware, many of us prefer to root our device to enjoy some additional features that unrooted android device doesn't offer. With a rooted android Tablet, you can install apps that ask root permission, flash various custom ROMs, install MODs and tweak various features. Root removes default bloatware apps that free-up lots of memory space and extend the battery life. To know more about benefits of rooting android Tablet, read- Complete Note on What is Rooting and Benefits of Rooting Android Tablet.

So, want to root
your Galaxy Tab 3 10.1 GT-P5200? Continue reading this page to get all
the necessary steps to successfully root your device. The root file we used in
this tutorial is safe and have nearly 100% success rate. We'll use Odin
software to flash the root file.
The tutorial is made with simple step by step guide, so that even an android newbie user can follow and successfully root his/her device. However, in this process you may loss your personal data and settings. So, we recommend you to follow all the backup instructions before proceed to rooting guide.
The tutorial is made with simple step by step guide, so that even an android newbie user can follow and successfully root his/her device. However, in this process you may loss your personal data and settings. So, we recommend you to follow all the backup instructions before proceed to rooting guide.
Caution
- This rooting tutorial is only applicable for Samsung Galaxy Tab 3 10.1 GT-P5200 model. So, don't try this in any other android device. Check your device model number from- Settings-About Tablet.
- Rooting voids your Tablet's manufacturer warranty. However, you can get back the warranty anytime by flashing official firmware.
- This guide is for educational purpose and you should try this at your own risk. We are not responsible if your device experience a soft brick after following this tutorial.
Pre-Requisites:
- Check battery percentage, charge your device to a decent level of at least 60% battery power. Your device should not turn off during installation.
- Turn on USB Debugging mode, go to Settings-Developer Options-USB Debugging
- Backup important data and settings to external storage- follow this guide
- Install USB driver for your device on your computer- Download Samsung USB Driver and samsung Kies
- All the above pre-requisites are very important and must be followed before proceed to installation guide. Hope you get all the above points and done as mentioned. Now, you are ready to move to the final step of this tutorial where we have arranged a step by step details guide on how to root Galaxy Tab 3 10.1 GT-P5200 running on official firmware.
2. Root
Galaxy Tab 3 10.1 GT-P5200 Running on Official Firmware through Odin:
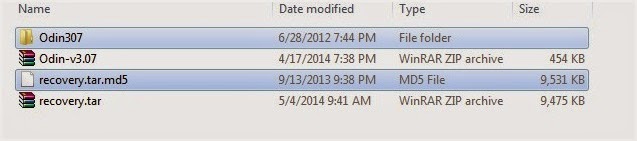
- Download TWRP Recovery and Root File or UPDATE-SuperSU-v1.91.zip for Galaxy Tab 3 10.1 P5200 and extract both the Zip file
- Download Odin 3.07 and extract the Zip file: Odin 3.07.Zip
- Now, Switch off your Tablet and boot Galaxy Tab 3 10.1 P5200 into Download Mode by pressing and holding the Volume Down and Power buttons together (long press until the boot screen appear), now press Volume Up key to proceed to Download Mode.
- Run the Odin3 v3.07.exe file as an administrator (Right click on the .exe file and click on Run as administrator)
- Now connect your Galaxy Tab 3 10.1 P5200 to your computer via USB cable
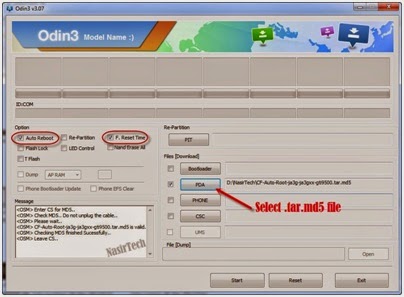
- In Odin3 screen, you should see a COM Port number like “0:[COM7]” at ID:COM section and “Added!” text at the message box. This means your device has been detected by Odin3.
- Make sure that, only the “F. Reset Time” option will be checked (Uncheck the “Auto Reboot”).
- Now, click on the PDA (AP in latest Odin) button and select the TWRP Recovery file (Recovery.tar.md5).
- Finally, click on the Start button to begin the rooting process, wait few moments.
- Once completed, copy the Root file to Tablet and Reboot in to Recovery by Pressing and holding the Volume Up and Power Buttons together
- Select install zip from sdcard, then choose the root file and flash
- You can now disconnect your Tablet from computer
- Finish
Congrats!
You have completed the tutorial to root Galaxy Tab 3 10.1 P5200 running on
official firmware. Hope you successfully done the rooting process. If you
followed everything as mentioned in the above tutorial, then your Galaxy
Tab 3 10.1 P5200 should now rooted and you have complete control over
your device. Now, install apps that ask root permission or flash various custom
ROMs. To verify your device is rooted or not, you can download and run
the Root
Checker App from
Google Play Store. If you have any doubt or query about the tutorial, feel free
to contact
with us using the
comment form below, and share your rooting experience with us.
How to Root Galaxy Tab 3 10.1
GT-P5200 (3G+WiFi)
This Rooting
guide is for Samsung Galaxy Tab 3 10.1 model number GT-P5200 running on Android
4.2.2 Jelly Bean. Before you root your tablet, it is recommended that you first
read guidelines and requirements section in order to safely gain root access.
In this guide, we’ll first flash the custom recovery and then using the
recovery we will flash the SuperSU which ultimately grants root permissions on
your device. So let’s move on and get started.
Guidelines and Requirements:
- Samsung Galaxy Tab 3 10.1 GT-P5200 (3G+WiFi). Do not try it on another variant it may brick your device.
- Custom Recovery: TWRP recovery
- Odin3 v3.07 download here
- USB drivers or Samsung Kies must be installed on your PC.
- Go to Settings > Developers Options and enable USB Debugging.
- Check that you’ve got enough battery charge on your tablet.
- Last but not the least, carefully read the read and follow the instructions and do not skip any step.
How to Flash TWRP Recovery on Galaxy Tab 3 10.1
As I said
earlier, We will first flash the Custom Recovery on Galaxy Tab 3 10.1.
Step 1: Extract the download files to a
new folder:
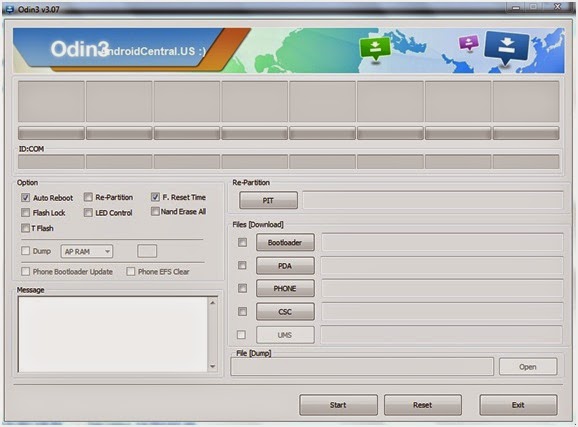
Step 2: Run Odin3 v3.07 to flash the
recovery:
Step 3: Reboot your Galaxy Tab 3 10.1 into
Download Mode, Hold down the Volume Down+Home+Power,
simultaneously for a few seconds and wait for the warning message to appear on
the screen. Further hit the Volume Up to continue.
Step 4: Connect your tablet via the USB
cable to the PC. Check that Odin detects your device.
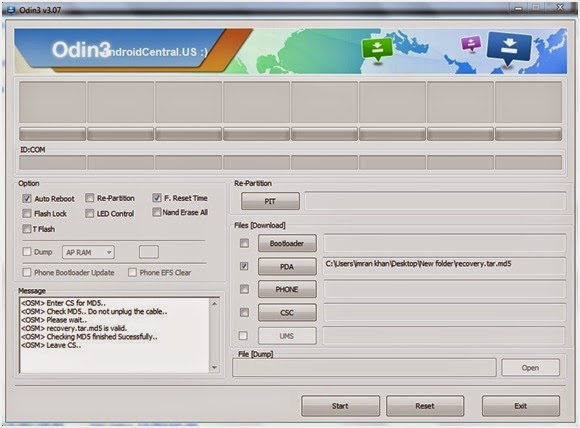
Step 5: Hit the PDA button and select the recovery.tar.md5,
from the extracted folder.
Step 6: Wait for Odin to verify the
tar.md5 recovery file and then hit the START button:
Finally
within a few seconds it will flash the TWRP recovery on your tablet. Once done,
Odin3 will give PASS!! message with green signal and during this your tablet
will automatically reboots.
Install Super User Samsung Galaxy Tab 3 10.1 GT-P5200
Now when
you’ve flushed the twrp recovery, now its time to get rooted.
Step 2: Now Reboot your tablet into TWRP
Recovery mode, Hold the Volume Up+Home+Power for a while till you the options
on your screen.
Step 3: Tap on the Install button and
navigate to the folder where you’ve placed the SUperSU zip file.
Step 4: Select it and swipe to confirm and
flash it.
Step 5: When done, reboot your tablet via
the recovery option.
Now when
your phone reboots, check that SuperSU has been installed, which confirms
you’ve now successfully installed Custom Recovery as well as gain root access.
That’s it
folks! It was all you needed to know and learn in order to root galaxy tab 3
10.1. Feel free to ask for further support, if you’re having issues with the
rooting process. Kindly leave a good feedback as well, if this post has
benefited you in anyway and it would be a good idea to share it with your
friends.
Share